Command-Line Tools
The following command-line tools are available after the installation of findus (pip install findus).
update-fw
Tool to update the firmware of the Pico Glitcher. Usage:
$ update-fw --help
usage: update-fw [-h] --port PORT [--version VERSION]

Update the firmware of the Pico Glitcher.

options:
  -h, --help         show this help message and exit
  --port PORT        /dev/tty* of the Raspberry Pi Pico
  --version VERSION  Pico Glitcher (one of v1, v2.1, v2.2, v2.3, v2.4, v2.5, v3.0)
Examples:
- Update hardware version 3.0 to the latest firmware version:
update-fw --version v3.0 --port /dev/tty.usbmodem2101
In case this script fails, use the old update mechanism with upload-ampy. See below.
upload
Tool to upload MicroPython scripts to the Pico Glitcher. This tool can be used, for example, to update the firmware of the Pico Glitcher or to update single files. Usage:
$ upload --help
usage: upload [-h] --port PORT [--delete-all] [--delete DELETE] [--file FILE] [--files FILES [FILES ...]]

Upload a micro python script to the Raspberry Pi Pico.

options:
  -h, --help            show this help message and exit
  --port PORT           /dev/tty* of the Raspberry Pi Pico
  --delete-all          Delete all files from the Raspberry Pi Pico
  --delete DELETE       Delete the file from the Raspberry Pi Pico
  --file FILE           File to upload to the Raspberry Pi Pico
  --files FILES [FILES ...]
                        Files to upload to the Raspberry Pi Pico
Examples:
- Upload or update an existing MicroPython script:
upload --port /dev/<rpi-tty-port> --file <file.py>
- Upload multiple files:
upload --port /dev/<rpi-tty-port> --files <file1.py> <file2.py>
- Delete all content:
upload --port /dev/<rpi-tty-port> --delete-all
upload-ampy (slow but reliable)
In case updating the firmware with the command update-fw or upload fails, there is a fall-back solution that relies on ampy. This script is slower, however, it is reliable.
upload-ampy --help
usage: upload-ampy [-h] --port PORT [--delete-all] [--delete DELETE] [--file FILE] [--files FILES [FILES ...]]

Upload a micro python script to the Raspberry Pi Pico.

options:
  -h, --help            show this help message and exit
  --port PORT           /dev/tty* of the Raspberry Pi Pico
  --delete-all          Delete all files from the Raspberry Pi Pico
  --delete DELETE       Delete the file from the Raspberry Pi Pico
  --file FILE           File to upload to the Raspberry Pi Pico
  --files FILES [FILES ...]
                        Files to upload to the Raspberry Pi Pico
The usage is the same as for upload.
Example to update the Pico Glitcher to the latest firmware:
cd fault-injection-library/findus/firmware
upload-ampy --files AD910X.py FastADC.py Globals.py PicoGlitcher.py PulseGenerator.py Spline.py Statemachines.py <config-version>/config.json --port /dev/<rpi-tty-port>
where <rpi-tty-port> is the tty port the Pico Glitcher is available at, and <config-version> is the config path for your specific Pico Glitcher hardware revision. For example config_v1 for version 1, config_v2.1-2 for versions 2.1 and 2.2, config_v2.3-4 for versions v2.3 and v2.4, and config_v3.0 for version 3.0, and so on.
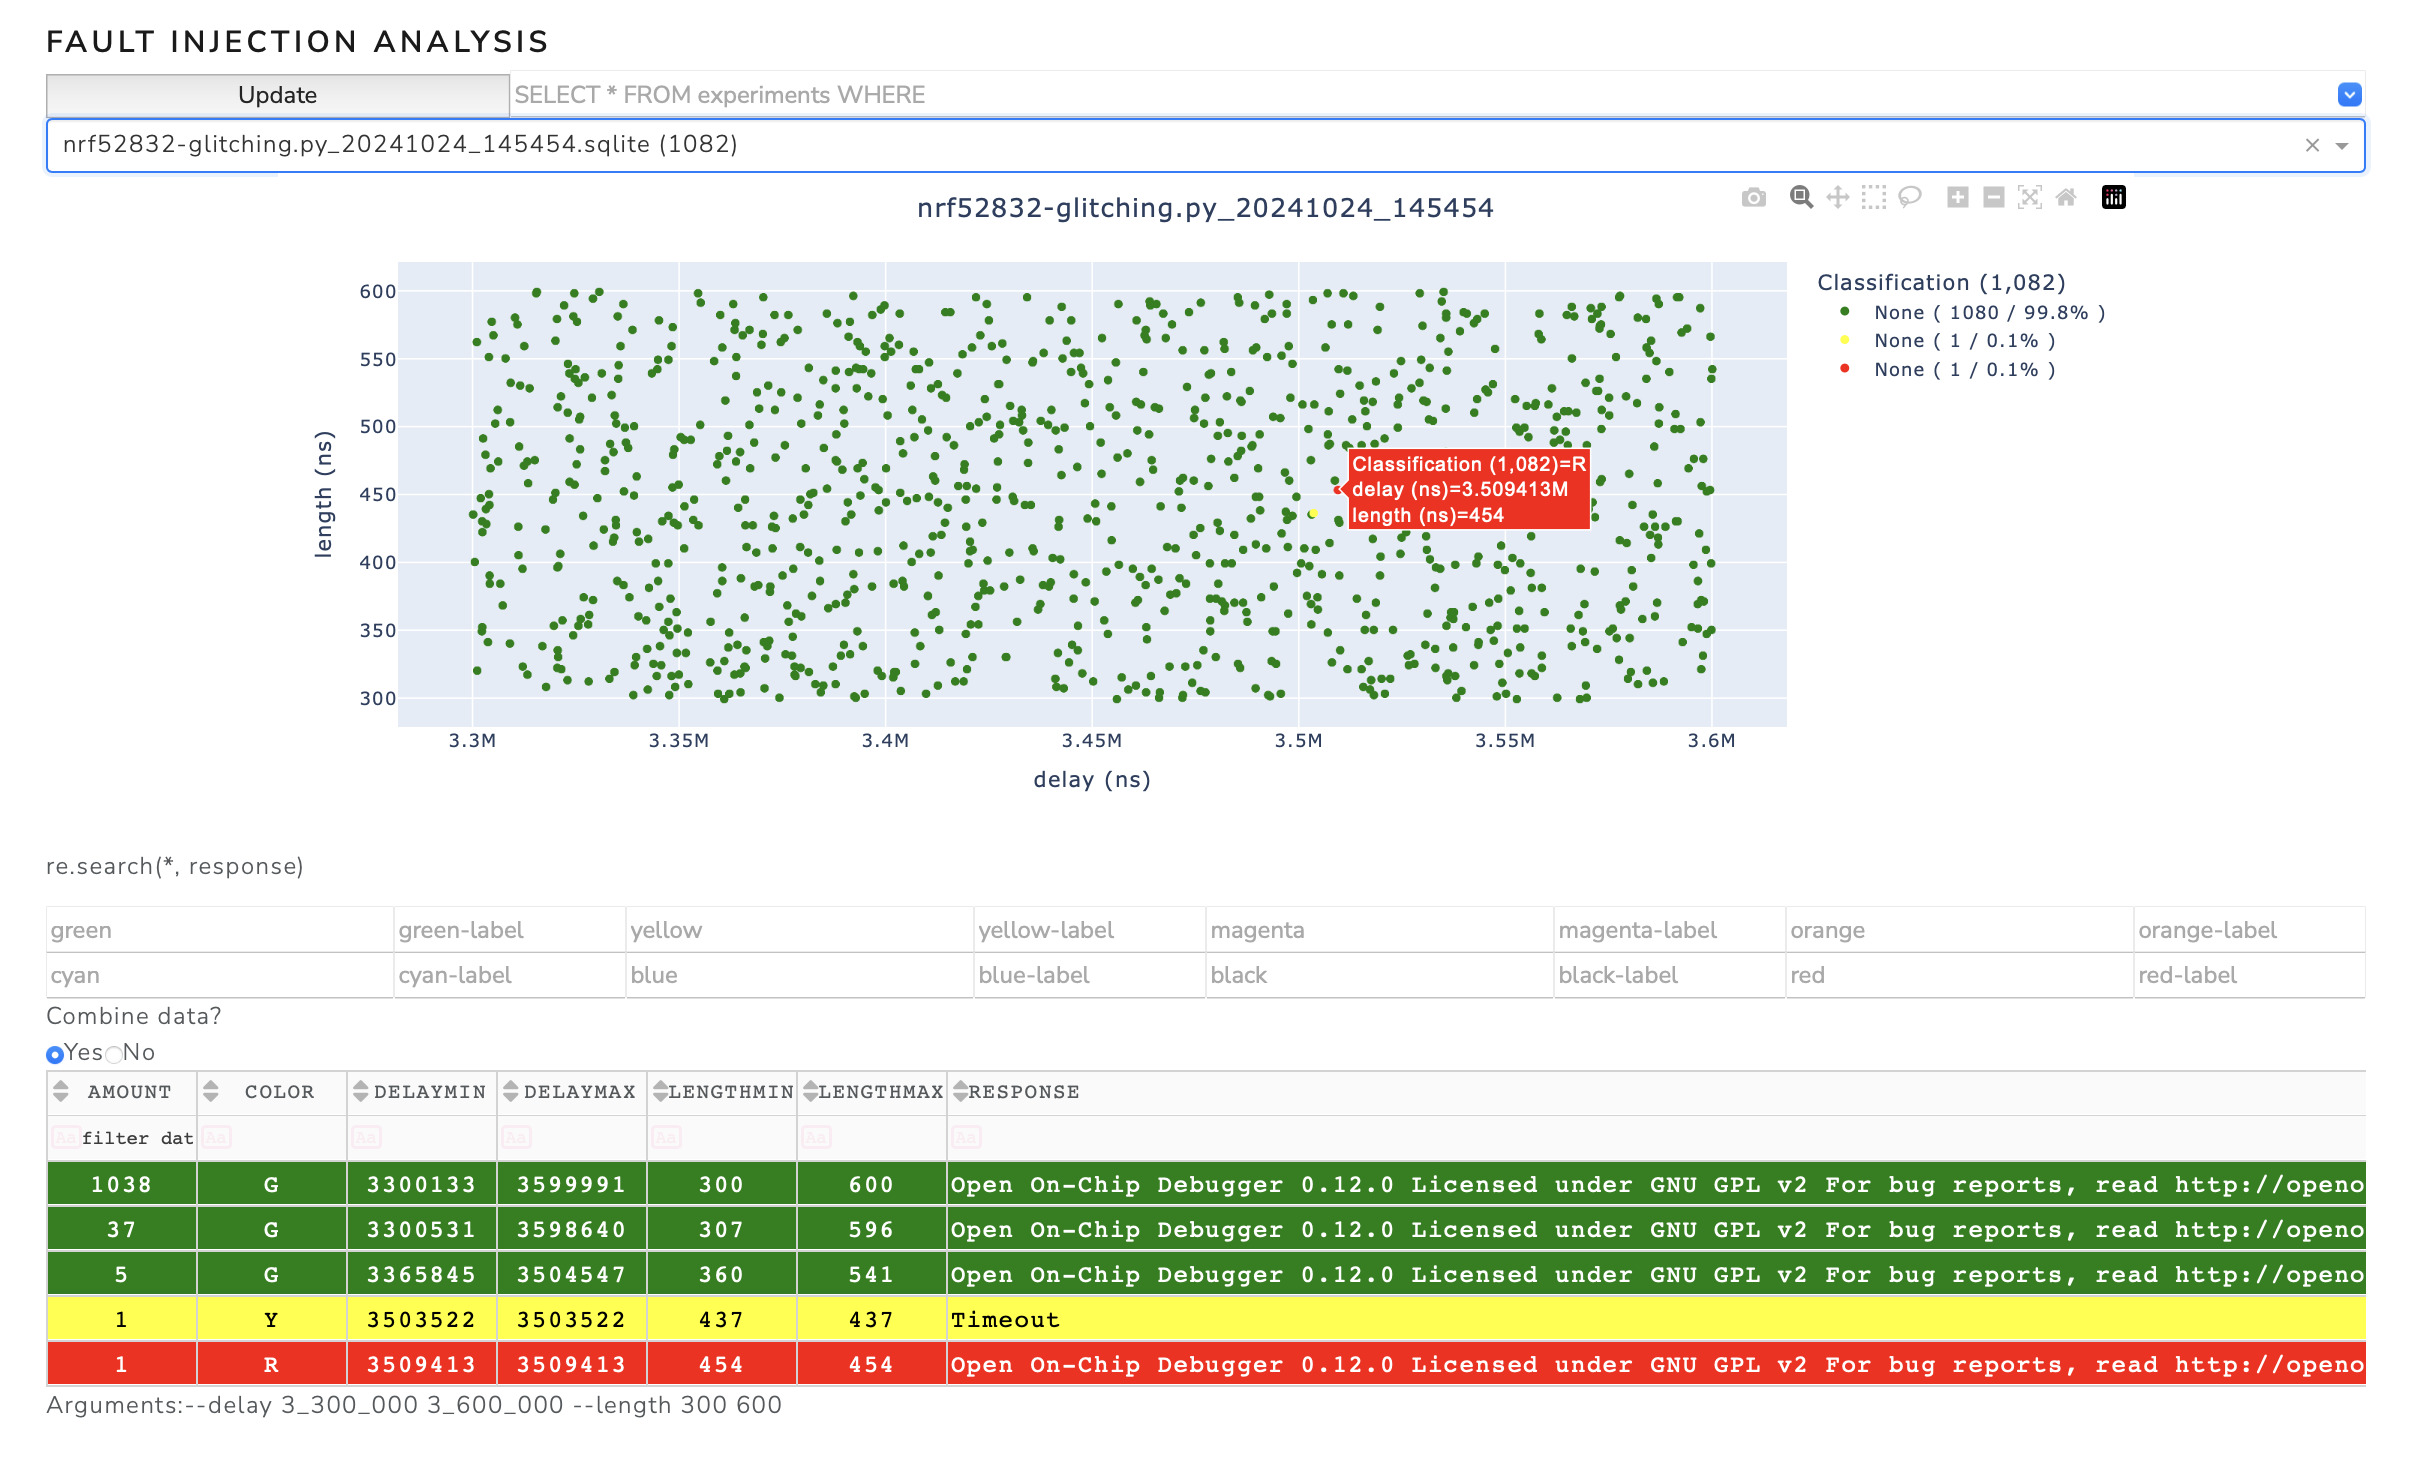
analyzer
Script that spins up a web application during a glitching campaign to observe the current progress. Must be executed in the directory where the glitching script is executed (this directory contains the database folder).
$ analyzer --help
usage: analyzer [-h] --directory DIRECTORY [--port PORT] [--ip IP] [-x X] [-y Y]
                [--aspect-ratio ASPECT_RATIO] [--auto-update [AUTO_UPDATE]] [--heatmap]
                [--x-number-of-bins X_NUMBER_OF_BINS] [--y-number-of-bins Y_NUMBER_OF_BINS]
                [--color-scale COLOR_SCALE]

analyzer.py v0.1 - Fault Injection Analyzer

options:
  -h, --help            show this help message and exit
  --directory DIRECTORY
                        Database directory
  --port PORT           Server port
  --ip IP               Server address
  -x X                  parameter to plot on the x-axis
  -y Y                  parameter to plot on the y-axis
  --aspect-ratio ASPECT_RATIO
                        aspect ratio of the plot relative to x-axis
  --auto-update [AUTO_UPDATE]
                        Whether to update the plot automatically. Optionally pass the update interval
                        in seconds.
  --heatmap             Generate a heat map
  --x-number-of-bins, --x-bins X_NUMBER_OF_BINS
                        Number of bins of the x-axis for the heat map
  --y-number-of-bins, --y-bins Y_NUMBER_OF_BINS
                        Number of bins of the y-axis for the heat map
  --color-scale COLOR_SCALE
                        Color scale to use for the heat map (findus, Blues, Reds, Greys, PuRd,
                        YlOrRd).
Example:
cd projects/airtag-glitching
analyzer --directory databases -x delay -y length
Visit http://127.0.0.1:8080 in your web browser to access the analyzer web application.
Alternatively, you can spin up the web application on all network interfaces to access it from other hosts:
cd projects/airtag-glitching
analyzer --directory databases --ip 0.0.0.0
If you want to generate a heat map that shows the number of successful events in a region, use:
analyzer --directory databases --auto-update 60 --heatmap --x-bins 15 --y-bins 15 --color-scale findus
database-tool
This is a small tool to operate on existing databases. For example, experiments can be removed on certain conditions, or two databases can be merged.
database-tool --help
usage: database-tool [-h] [--dbname DBNAME] [--cleanup CLEANUP] [--remove REMOVE] [--merge databas1 database2 output]

options:
  -h, --help            show this help message and exit
  --dbname DBNAME       Name of the database
  --cleanup CLEANUP     Remove experiments with a certain color from the database.
  --remove REMOVE       Remove experiments by a certain condition. For example, `id = 1000`, `id > 1000`, `color = "C"`
                        or `delay < 6000`.
  --merge databas1 database2 output
                        Merge two databases
Example how to remove experiments by a given condition:
database-tool --dbname database1.sqlite --remove 'color = "G"'
database-tool --dbname database1.sqlite --remove 'id > 1000'
Example how to merge two databases:
database-tool --merge database1.sqlite database2.sqlite out.sqlite
stm32-bootloader
Communicate with a STM32 microcontroller in bootloader mode and read the flash memory (only if RDP-0 is active). If read-out protection is active, the corresponding target responses are printed.
Example:
stm32-bootloader /dev/<target-tty-port>
stm8-programmer
Communicate with a STM8 microcontroller in bootloader mode and read the flash memory (only if RDP-0 is active). If read-out protection is active, the corresponding target responses are printed.
Example:
usage: stm8-programmer [-h] --port PORT [--baud BAUD] [--write WRITE] [--read READ] [--number-of-bytes NUMBER_OF_BYTES] [--write-option WRITE_OPTION]
                      [--read-option [READ_OPTION]]
power-on
Enable VTARGET with this simple script. Can be necessary, for example, to supply the target with power for debugging purposes. Alternatively, the target device can also powered via the multiplexing stage, pulse-shaping stage or external power supply. If the --rpico argument is omitted (no Pico Glitcher connected), it will try to connect to the ChipWhisperer Pro instead.
power-on --help
usage: power-on [-h] [--rpico RPICO] [--power POWER] [--multiplexing] [--pulse-shaping] [--voltage VOLTAGE]

Power the target via different output stages of the Pico Glitcher (VTARGET, multiplexing stage, pulse-shaping stage or external power supply).

options:
  -h, --help         show this help message and exit
  --rpico RPICO      rpico port
  --power POWER      rk6006 port
  --multiplexing     Use the multiplexing stage to power the target (requires PicoGlitcher v2).
  --pulse-shaping    Use the pulse-shaping stage to power the target (requires PicoGlitcher v2). Be sure to calibrate the pulse-shaping stage's voltage output.
  --voltage VOLTAGE  The voltage to set. Note that the voltage output of the pulse-shaping stage can not be controlled with this parameter. The voltage output of the pulse-
                     shaping stage must be set manually with the potentiometer.
Example:
power-on --rpico /dev/<rpi-tty-port>
stm32-power-cycle-and-read
Test the power supply capabilities of your setup by executing this script. The target's response is read over UART after power-cycle.
If the --rpico argument is omitted (no Pico Glitcher connected), it will try to connect to the ChipWhisperer Pro instead.
stm32-power-cycle-and-read --help
usage: stm32-power-cycle-and-read [-h] --target TARGET [--rpico RPICO] [--dump] [--power POWER] [--multiplexing] [--pulse-shaping] [--voltage VOLTAGE]

Power the target via different output stages of the Pico Glitcher (VTARGET, multiplexing stage, pulse-shaping stage or external power supply) and dump the flash content of a
STM32 in bootloader mode via a UART connection.

options:
  -h, --help         show this help message and exit
  --target TARGET    target port
  --rpico RPICO      rpico port
  --dump
  --power POWER      rk6006 port
  --multiplexing     Use the multiplexing stage to power the target (requires PicoGlitcher v2).
  --pulse-shaping    Use the pulse-shaping stage to power the target (requires PicoGlitcher v2). Be sure to calibrate the pulse-shaping stage's voltage output.
  --voltage VOLTAGE  The voltage to set. Note that the voltage output of the pulse-shaping stage can not be controlled with this parameter. The voltage output of the pulse-
                     shaping stage must be set manually with the potentiometer.
Example:
- Power cycle and read the target's response:
stm32-power-cycle-and-read --target /dev/<target-tty-port> --rpico /dev/<rpi-tty-port>
- Power cycle and dump the flash content of an STM32 target in bootloader mode (without read-out protection active):
stm32-power-cycle-and-read --target /dev/<target-tty-port> --rpico /dev/<rpi-tty-port> --dump
power-cycle
Test the power supply capabilities of your setup by executing this script.
If the --rpico argument is omitted (no Pico Glitcher connected), it will try to connect to the ChipWhisperer Pro instead.
power-cycle --help
usage: power-cycle [-h] [--rpico RPICO] [--power POWER] [--multiplexing] [--pulse-shaping] [--voltage VOLTAGE]

Power-cycle the target via different output stages of the Pico Glitcher (VTARGET, multiplexing stage, pulse-shaping stage or external power supply).

options:
  -h, --help         show this help message and exit
  --rpico RPICO      rpico port
  --power POWER      rk6006 port
  --multiplexing     Use the multiplexing stage to power-cycle the target (requires PicoGlitcher v2).
  --pulse-shaping    Use the pulse-shaping stage to power-cycle the target (requires PicoGlitcher v2). Be sure to calibrate the pulse-shaping stage's voltage output.
  --voltage VOLTAGE  The voltage to set. Note that the voltage output of the pulse-shaping stage can not be controlled with this parameter. The voltage output of the pulse-
                     shaping stage must be set manually with the potentiometer.
Example:
- Power cycle via the Pico Glitcher:
power-cycle --rpico /dev/<rpi-tty-port>
- Power cycle via the ChipWhisperer Pro:
power-cycle
pulse-calibration
A small tool to calibrate the digital-to-analog converter of the pulse-shaping expansion board.
pulse-calibration --help
usage: pulse-calibration [-h] --rpico RPICO [--vhigh VHIGH] [--vlow VLOW]

options:
  -h, --help     show this help message and exit
  --rpico RPICO  rpico port
  --vhigh VHIGH  The measured maximum voltage of the pulse.
  --vlow VLOW    The measured minimum voltage of the pulse.
Execute the following command and follow the notes on the command line:
pulse-calibration --rpico /dev/<rpi-tty-port>